
How the stark simplicity of high key can elevate your wildlife images
If you’re looking to set your wildlife photography apart, here’s a technique that will take your images to a whole new level.
We’re fans of the ‘less is more’ approach in wildlife photography, so a technique that depends on stark simplicity for its success gets the thumbs up from us.
With plentiful subjects on safari there’s often the chance to experiment with a couple of different techniques once you’ve got the perfect, pin-sharp images from your wants-list in the bag. Having a go at something that could totally transform your photographic style, or at the very least reward you with some stand-out shots, has got to be worth a go.
High-key is all about creating light, bright, airy almost ethereal wildlife pictures where backgrounds, shadows and even colours are pared right back to put more emphasis onto your subject. It’s a great way to isolate your wildlife subject from its background.
‘High-key’ might sound high falutin’, but don’t be put off. All you need to do to create the effect is to add extra light to the scene – using deliberate over-exposure – to reduce, or remove, shadows and as much finer detail, as you choose. The aim is to create a simpler image, weighted toward the lighter tones, often including a stark white background to set the subject off.
Usually in photography the aim is to avoid any highlights burning out in your picture, but as high-key is a more creative response to photographing wildlife subjects, things are much more subjective. The usual ‘rules’ on exposure can be flexed.
How much detail you retain in your high-key interpretation is up to you. The starting point is to lose detail in the background while holding it where you want the focus of interest in your image to be. But there’s nothing to stop you going quite minimalistic with your subject as well as its backdrop if you want – creating an almost gossamer sketch.
This is a helpful technique to have up your sleeve when it’s overcast or when the scene, your subject and the lighting are a bit flat. It’s comforting to know there’s still the chance to come back from your session on such days with some stunning images. But the high-key approach should be seen as much more than a ‘bad-light’ back-up.
If you’re not convinced, check out the work of some of some of the leading wildlife fine-art photographers out there and you’ll see that a good portion of their top-selling work bears the high-key hallmarks.
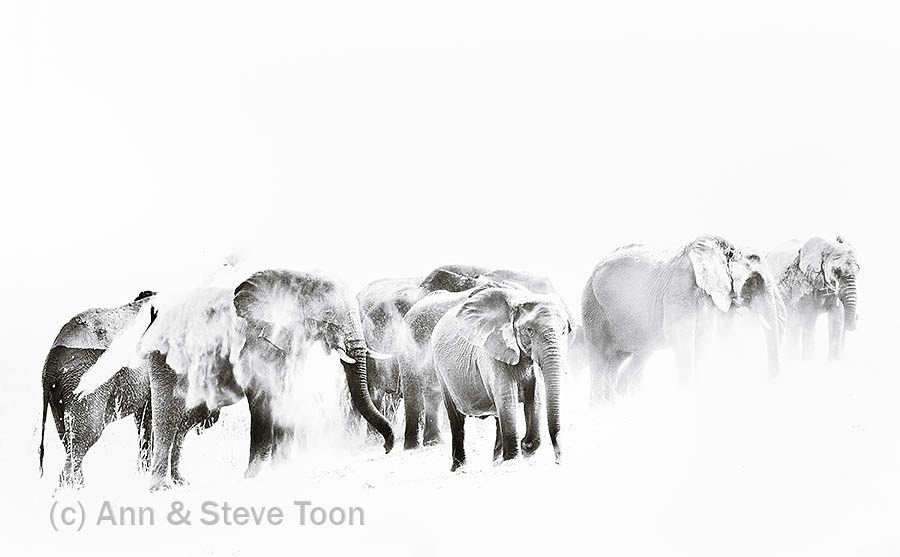
Canon EOS 1DX with 100-400mm zoom lens at 264mm, 1/250 second, f/13, ISO 400, +1.6EV
Ann says: A bright, overcast day provided the perfect opportunity to try a high-key treatment for this shot of dusting elephants. The pale dust powdering the elephants made it look like they were being rubbed out. Deliberate over-exposure would exaggerate this effect and against the white sky would make the herd appear to float.
Our top tips for mastering high key photography
- On bright overcast days – yes, you do sometimes get them even in Africa’s dry season – we always keep our eyes peeled for subjects and situations that might benefit from a high-key interpretation. A cleanly defined subject in flat light against a lighter, uncluttered background together with a ‘softbox’ sky is the trigger for us to consider the merits of a high-key approach.
- Monochromatic scenes, misty days where the colour palette is muted by haze, subjects in light shade against a bright background, still water and sometimes bright sunlight when the scene appears drained and bleached out, all can be potential candidates for considering a high-key approach.
- Featureless backgrounds with little shadow detail work best. Snow is ideal, but so far it’s not presented on our Africa trips! Clouds and pale water in still conditions, sand and bleached earth – these are the ingredients that will help when doing high key shots in the bush.
- When you have the right conditions, the next step is to find suitable subjects. Clear, dark detailing that will contrast well against a pale background gets a big tick. The stripes of a zebra, a leopard’s spots, a giraffe’s patterned skin or the deep creases of an elephant’s hide, all can work well. You can hang on to these diagnostic details – helpful to the viewer – when you deliberately over-expose your shots. Alternatively, take a totally opposite route and search out pale subjects – white subjects can look very elegant set against a bright overcast sky – giving you a delicate ‘white-on-white’ take.
- Make sure your subject’s outline is cleanly separated from the background – as you would do when shooting silhouettes.
- Familiarise yourself with some examples of high-key wildlife images to help soak up the ‘signature style’ before heading out. If you fancy having a go yourself this research will give you a head start in spotting the potential for these pictures when you’re out there facing subjects in the wild.

Canon EOS 5D MkIII with 500mm lens plus 1.4x converter, 1/800 second. f/8, ISO 400, +1EV
Steve says: Interesting behaviour in harsh light and with light behind the subjects made it worth trying a high-key interpretation to salvage the situation. What little detail there was in the featureless arid backdrop was easily eradicated by making the image even brighter and converting to black and white before adjusting the white, contrast and clarity sliders a little at the editing stage.
- Deliberate overexposure for intentional creative effect is your route to making successful high-key images. You’re aiming for much brighter tones than might be traditionally acceptable. How much brighter you ramp things up depends on the situation and what mood or message you’re trying to convey in your photograph.
- Experiment when starting out by tweaking exposure on the plus side by degrees. Bear in mind the potential for blown highlights and lost detail will increase the more your scene is overexposed so going carefully pays. Remember it doesn’t matter if you do lose some detail if it works and is acceptable in your finished result. Don’t get too hung up because your histogram is heavily weighted towards or even clipped on the right. It’s perfectly okay to blow out backgrounds completely, or even parts of your subject, if it makes your image more visually successful.
- We shoot on aperture priority most of the time so our own approach when creating high-key images is to use the exposure compensation control on our cameras to dial in the extra exposure we require on the plus side of the scale incrementally. We mainly use evaluative-metering and generally find with these shots that we need to crank up our exposure compensation quite a bit – sometimes by at least two or three full stops.
- You’ll get the best results with high-key where you’re clear in your mind exactly what you’re trying to communicate to your intended audience. These images tend to look tranquil, quiet and serenely simple – like fine tracery or delicate lace. Aim to match your subject’s pose or behaviour with the mood the technique provides you. A big cat, for example, will probably work better with a high-key treatment if it’s reclining gracefully in repose than when it’s on a charge. While high key shots work beautifully in the muted colours underlined by the technique, consider converting your high key shots into back and white at the editing stage where you want to bring out the full graphic effect.
- Most high key pictures require some post-processing to complete them. It’s best to shoot in RAW so you can adjust the white balance at the editing stage if required. You can bring up your white backgrounds to best effect with your editing software. Try shifting the white slider as far to the right as you can go if you want the full studio-set backdrop effect.
- Depending on what you want to achieve you may also need to increase the contrast to make your subject pop a bit better in post-processing. The clarity slider is also helpful where you want to emphasise the texture and patterns in fur, skin or feathers. Have a play.
- Last but not least – don’t worry if you foul things up a bit at the capture stage. You can tweak these shots quite a bit at the editing stage if you want/need to. In fact, a good way to learn what works well with a high-key treatment is to look through your back catalogue of images and have a go reprocessing one or two you reckon might be suitable candidates. It’s a great rainy day exercise to try if you are keen to add this technique to your toolbox.
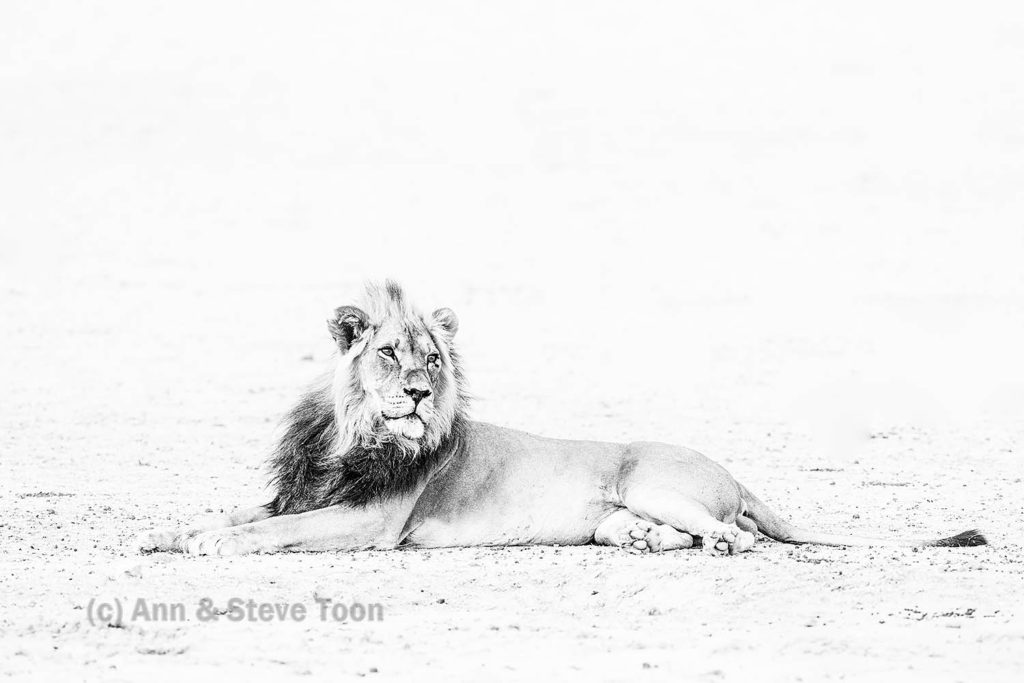
Lion, Kgalagadi Transfrontier Park, South Africa
Ann says: If you find a subject in light shade with a brighter background behind, it like this male lion resting in the shadow cast by a large camelthorn, it can be tough to get a great exposure. Here the featureless background of the Kalahari’s semi-desert terrain made a mono high-key treatment of the subject a worthwhile solution.
Canon EOS-1DX with 500mm lens plus 1.4x converter, 1/800 second, f/8, ISO 640, +2EV


Leave a Comment